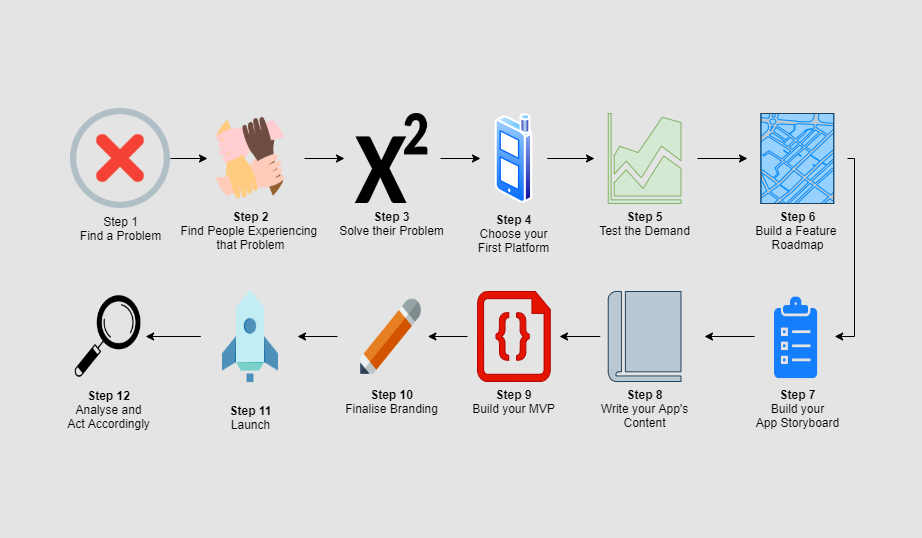
How to Create and Launch Your App
A 12 Step Guide for Those Who Don't Code
 Josh Case
Apr 7th, 2020 · 40 min read
Josh Case
Apr 7th, 2020 · 40 min read
Many people steer clear from starting their own software projects because they fear the technical barriers to entry.
It is, after all, quite difficult to build beautiful, professional, scalable apps that serve millions of users and change the world in a meaningful way. However, there are two things that these people might not realise:
- None of those professional apps started out as either beautiful or scalable.
- Programming is only one part of getting a tech project off the ground, and that essentially anyone who has the most rudimentary IT skills can get 85% of the way towards making their app idea a reality on their own.
With this in mind, I've written this 12 step guide to creating and launching your own app as a non-programmer. As such, 11.5 of the steps do not require programming skills. I've intentionally structured the article this way to demonstrate that the actual nuts and bolts programming of an app is a surprisingly small part of the overall development process, and to highlight the fact that anyone can get a long way towards launching their own app independently.
In short, you don't need to build the whole thing on your own. All you need to do is get far enough along - and build enough steam - so that somehow you get access to someone with the right skills to get you across the finish line. (There are a couple of different ways this can happen. More on this below).
Your goal should be to delay the actual programming as long as possible.
To prove that this guide works, I'm planning to use it in an upcoming article series in which we'll build and launch an app as a community with full transparency regarding the expense, the time investment, the downloads, the money earned, and even some crowd-sourced decision making. I'm also writing a book for doctors and medical students who want to learn to code quickly. If either of those projects sound interesting to you, be sure to leave your email here and/or send me a message on LinkedIn or Twitter, and you'll be the first to know.
Enough chin-wagging, let's dive in. Here's How to Create and Launch Your App: A 12 Step Guide for Those Who Don't Code:
Step 1: Find a Problem Worth Solving
Presumably you've already done this if you're trying to build an app, but you'd be surprised how often wannabe innovators (myself included) find themselves working on a problem that isn't worth solving. That might be because the problem isn't that big, it's not that common, or it's not that painful, or a number of other things.
Essentially, going to the effort of building an app to automate or streamline something is quite a big investment in terms of time, money or both, and so you want to be sure (as much as possible at this stage) that the problem you're working on is worth the effort in the long run.
It's worth noting here that your definition of "worth solving" will vary and will most certainly depend on your overall goals. If you're trying to build the next Uber or Spotify, you probably need a really big problem. However if you're learning to code for example, your target problem size might be (and probably should be!) much, much smaller.
As a side note here, the Y Combinator Startup School podcast has a really cool video on this topic. They list the 6 Qualities of a Good Problem as the following:
- Popular
- Growing
- Urgent
- Expensive
- Mandatory
- Frequent
Ideally you want at least 1 or 2 of those qualities - 3 would be excellent. A good place to start might be your workplace. What issues are you facing on a daily basis that are popular, growing, urgent, expensive, mandatory or frequent?
Step 2: Find People who Experience this Problem Frequently
So hopefully by now you've found your problem worth solving, or at least narrowed it down to a small number of possibilities. If you can't narrow it down, that's okay - you can complete the next few steps with multiple problems in mind and that in itself might help you decide which one you want to work on.
Your next goal is to find people who encounter your problem regularly. From your perspective, in an ideal world they would be encountering this problem several times a day, and it would be costing them large amounts of time, effort or money. This is extremely important, and is often overlooked by headstrong innovators or programmers like myself. The temptation is to skip this step and say "I'm sure this is a problem worth worth solving, we will simply find people who need this app later on in the process.". This is a mistake.
User acquisition starts now - before you invest a single cent or minute. It should also continue to be a daily activity from now until forever.
Your ability to acquire users in the early days is the number one factor that determines the success of your app launch.
You should find people who experience the problem now and not later for the following reasons:
- When you finish your app, you're going to need to contact these people anyway to ask them to use it. You might as well start now as building relationships with people takes time.
- People who are facing your problem directly are the best placed to provide insight to your potential solutions. (You should be seeking feedback from these people before and after every future step in this guide on a formal or informal basis).
- People like to be in the inner circle of innovative projects - especially those that evoke the sensation of "going somewhere". Every person you engage early in the process becomes an early adopter that will be an enormous asset when it comes time to launch.
- If you aren't able to find people experiencing your problem now, you should probably give up or postpone this project until you can. This may be an indication that your problem is not as important as you first thought. Furthermore, even if your problem is perfectly legitimate, if you can't access the people experiencing it, it will be very hard to make progress.
At this stage, all you're looking to do is establish a relationship with these people. The value proposition is quite simple; you can see the problem they're having, and you'd like to better understand it so you can help solve it. If it's truly an important problem, very few people will turn you down.
Some other tips for this stage include:
- Go where these people go. If your problem is for weightlifters, go to the gym. If it's for Youtubers, go to Youtube. If it's for doctors, go to the hospital.
- Send them a message on social media. Call them. Meet them for coffee. The worst case scenario is that they ignore you or decline. Brush it off. It's a numbers game! On that note though, I've almost never been told a flat-out no. What's more realistic is a response like "Not right now". Be very wary of this response. This may be because the person is just too busy right now, but it may also indicate that the problem is not causing them enough pain to ever warrant using your solution.
- Ideally you want to establish an ongoing relationship with these people. With that in mind, be humble, professional, polite and courteous at all times. This includes when people decline to engage with you. Additionally, I recommend maintaining a list of people you've spoken to (even in an Excel spreadsheet) with some rudimentary contact information and a note or two describing your interactions with each person. This can be updated each time you interact with them. This will come in very handy at launch time.
- Where possible, try to find multiple people rather than individuals, and don't let the feedback of any one person influence your decisions too much. The goal is to ignore the outliers, and act on the trend.
- If no-one wants to talk to you about the problem, that's okay. In fact, it's good that you found out now. Remember, in doing all of this, you're trying to prevent the scenario in which you spend 6 months building an app for a problem that no-one cares about. By finding that out now, you can save the months of effort and money and move onto the next idea after only a few days.
Step 3: Think of a Conceptual Solution to that Problem (or a subset of that problem)
By now, you've got your problem and found a found a group of people who are really having issues dealing with it.
Here's where your creative genius needs to kick in. You need to think of a solution to the problem these people are having (or at the very least, a solution to a subset of that problem).
Depending on the context for your problem, this may be easier said than done. In general, I'd advise you to simplify the problem as much as possible to 1 or 2 very core issues. What is the simplest solution that could solve these 1 or 2 key issues, while ignoring the extraneous stuff? Your goal is to reach a solution to your users' pain points as quickly as possible - Because if you can't solve their pain points, you might as well tear down the project and start again.
In the same way that there are many ways to skin a cat, there are many ways to solve a problem. However, there are some trends from successful apps that we can use to help us craft our own solutions:
- Share things: Uber, Airbnb and Lime all leverage the sharing economy to solve problems like access to transport and housing.
- Organise things: Spotify puts all your music into one place, and will never run out of storage space, unlike your phone. LastPass puts all your passwords into one secure location.
- Provide convenience: GoogleDrive and DropBox make sharing files as convenient as possible. Food delivery services sell convenience more than they do food.
- Digitalise things: Apps like SurveyMonkey, Xero and Shopify take traditional paper-based processes and digitalise them, enabling users to leverage the power of the computer processor rather than the pen and paper.
I encourage you to look at the problem you're facing and ask yourself the following questions. Could the solution to this problem lie in dormant resources that could be shared? Could the problem be better organised? Could any part of the process be more convenient? Could it be digitalised?
Of course, these are just a few examples of different approaches to problem-solving with software. You can look at any other successful app and look at the strategy they use to solve their target problem, and try to apply it to your problem.
It's important to note here that the best solution to your target problem might not be found in an app. Shockingly, software is not a solution to all the world's problems. It's very appealing in many ways as it's generally a scalable and powerful way to fix problems, however it's not an instant fix for everything. Consider that another medium might be better suited to solving your problem (a book, an invention, a course etc). For simplicity's sake, this guide will exclude all media that aren't software, but just remember - there are lots of other options out there, too.
Step 4: Choose your First Platform
With a conceptual solution in mind, it's now time to choose your first platform to launch on.
Here are your general options:
- 1. Web
- 2. Mobile
- 3. Desktop
- 4. Other
I'm going to briefly touch on each one and discuss the pros ands cons. In my opinion, almost everyone should be starting on web. If you crush your launch and start exploding, you can expand to other platforms later. There are a few reasons for this, which I'll touch on below:
- Web
Pros include low development cost, quick release cycles and cross-device compatibility essentially out of the box. Furthermore, on web you're in complete control of the app landscape, whereas on mobile for example you're at the mercy of Apple and Google's review queues and rules every time you want to release an update. Another big pro is the enormous quantity of apps, plugins and drag-and-drop interfaces that have made it very easy for someone with basic computer literacy to put a proof of concept model together. Cons include it being less "slick" and not providing an optimised experience for mobile in general. - Mobile
Pros include the potential for excellent device-native user experience, it being "cooler" than the web, and that mobile is the fastest growing platform by far. Cons include much higher development cost and time, being bound to distribution rules and review processes from Apple and Google, and far more general bureaucratic administration required to get started. For example, Apple requires an ABN, your tax file numbers, a D&B number etc before you can release apps on the AppStore. Additionally, on mobile there's an age-old debate about Hybrid vs Native development approaches, which are unfortunately well beyond the scope of this article. In short, Hybrid development approaches allow you to develop iOS and Android apps from one code base, at the expense of some performance and functionality. Native is the "traditional" way of developing apps, for iOS OR Android. In general, for hackers following this guide, I recommend a Hybrid approach. Discuss this with your developer, who is likely to know more. Note: If you do choose mobile and want to launch on the Apple AppStore, you're looking at $120AUD per year to keep your apps up there. GooglePlay has a one-time fee of around $30AUD. Furthermore, I recommend starting the process of making these accounts now, as some of the processes involved taking several days to finalise. This will also allow you to start preparing your store listings. I won't go into more detail here as there are other guides available, but if you have more questions about this, please send me a message. - Desktop
There aren't many apps these days that are launched first on Desktop, although of course there are a few exceptions. Most of this space has been chewed up by Web because the tools developers have available to them these days have made it far easier to make high-quality cross-platform web apps than ever before. - Other
I don't have much to say about this category other than to acknowledge it exists. Maybe your app is for Nintendo Switch or John Deere Tractors or some other miscellaneous category, in which case, you should of course choose that platform.
Step 5: Test the Demand for your App
With a conceptual solution to your target problem in mind, and your first platform chosen, it's now time to test the demand for your app.
I first read about this sneaky little technique from successful entrepreneur and author Tim Ferriss. What you're going to do now is called a smoke test.
Here's how it works. For the next little while, you're going to pretend that your app is built and ready to go. You're then going to "launch" the app and see what sort of response your launch generates. If your launch gets lots of clicks and engagement, it's time to get cracking with the rest of this guide. If it flops, it's a fairly good indication that there isn't much demand for your product, and it might be time to re-think your strategy or your app idea altogether.
There a few different ways you can go about this.
If you've got a nice little list of email addresses of people who are interested in your problem, you could email them all right now with a link to download/sign-up/register for your app. You can make a very compelling sign up form using Google Forms and a little bit of elbow grease. An alternative would be to use a free one-page website (a landing page) from any number of sources. You can then measure the number of people that click the link or sign-up to your app as a proportion of how many emails you send. If you get 30-50% of people to sign-up, you've done extremely well and that's a very good indication you might be on to a winner. If you get 10-20% of people that's also fairly good, but if you're getting 5% or less of people in a highly-specific and targeted email list wanting to sign up or use your application, that's another suggestion that the solution you're promising isn't that compelling after all.
Consider using the template email provided here:
"Hi Dr Green, I hope you're well.
You might remember I spoke to you recently about creating an app to help address the issues you've been having with problem. We're confident we've created a pretty effective solution in App Name, and if you click the following link, you can get access to our first version before everyone else. We'd really appreciate your feedback, and would love to know how you go using it.
Here's the link: https://joshcase.dev
Kind regards,
Josh"
Another crafty thing you can do (especially if you don't have an email list) is to create a brand new Facebook brand page with the name of your app. Use any of a dozen free colour scheme pickers to help you find your first brand colours. Don't worry too much about these now, you can change them later. Get some placeholder graphic design assets, either made by yourself using an awesome free tool like Canva or pay someone a few dollars on a website like Fiverr to draw you some. A profile picture and a cover photo might be a nice start. While you're there, you might as well get your first app logo made for $5-$7, too.
(A warning here to the wise: do NOT spend hours and hours ruminating over which logo to use in the beginning. Choose the first half-decent one and go with it. You have plenty of time to fix your branding once you're up and running, and too much time-wasting on things that don't matter is a big reason projects fail).
With your Facebook page set up, run a few Facebook ads with a low budget (ie $5-$10 per day) for a week or so. Your goal should still be to get people to sign up or commit themselves to your application in some way. You're likely to have to experiment with your ad text and graphics to find something that works. If all goes well, ideally you'll be collecting a few leads each and every day. Be sure to try and capture the emails of these people, as you'll hopefully be able to convert them into users when the true launch time comes anyway. An alternative for people with more time and less money is to leverage content marketing instead of (or in addition to) Facebook ads, where you try to produce highly engaging content in the form of articles, videos or memes (anything really) that would resonate with your target audience, and then direct people towards your app. Note that this is fairly labour intensive, however it can be extremely effective when done correctly.
If you're having trouble getting anyone to commit to your app by leaving contact details, proceed with caution. This is a strong indicator that people don't want your app. Believe me, nothing changes when you have actually coded your app. People don't suddenly starting wanting what you've made, just because you've finished building it. If you can't find a way to recruit people now, you'll probably want to rethink proceeding with your current idea at all.
Importantly, make sure your Google Form or your landing page look as "ready to go" as possible. Your goal is to test whether people want your app, and the most scientific way to do that is make sure that everything is as convincing as possible. Use phrases like "Buy Now" or "Download Now" on your buttons. If you're on mobile, include the offical "Available on the AppStore" badges. When someone clicks the button and leaves their email, simply provide a message saying "We're having some technical issues at the moment, but if you leave your email here we'll be sure to let you know when they're fixed".
I can hear you saying:
"But what happens when the people I contact find out our app isn't actually available yet? Won't my brand or reputation be damaged in some way?"
The risks of this happening are actually infinitely small. People are busy with their own lives, and if you never get back to them with an actual download link, most of them will never notice, let alone do anything damaging to your "brand" (which doesn't even exist yet). People have short memory spans. And if they do notice that you haven't been in touch - that's a good thing! That probably means they really want what you're potentially offering. Alternatively, run your smoke test under a different brand name/colour scheme as per the above instructions. Collect the emails, and then when it's time to launch, re-launch under your preferred app name/colour scheme. The risk to your "brand" is now 0.
Step 6: Stratify your App Features (Build a Feature Roadmap)
Ideally by now you've got some fairly clear evidence that there is concrete demand for what you're trying to build and hopefully have a few hundred emails in your mits. If not, that's okay - I just don't recommend proceeding until you have generated some tangible level of interest because nothing changes once your app is actually built. Consider repeating steps 1-5 with another problem or solution in an attempt to find better demand if this isn't the case.
It's now time to start working towards actually getting your app built. As you're well aware, it's a highly resource-intensive process to build an app both in terms of time and by extension, money. That's why up until this point we've been doing everything we can to avoid having to actually build it. This defensive approach to resource allocation should continue when it comes time to plan releases of your app. You should only invest as many resources as is necessary to prove that you can in fact solve the problem you're trying to solve.
With this in mind, it's essential that you focus on the core problems your users are facing, and not the bells and whistles that surround them.
Let me give you an example. I did a freelance job for a company that did a series of projects with a government department. These projects spanned many months and sometimes years, and this particular department had quite a high turnover of staff. Before I got involved, most of the projects were managed through individual employee email accounts. This made it very difficult to review a project in its entirety when a staff member who had been involved left the department.
- Core Problem: Project information trapped in individual user email accounts
- Solution: Central dashboard for storing project information
In an ideal world this dashboard would have a whole heap of cushy features like Xero integration, time-tracking, GPS integration and multiple types of user accounts with complex permissions and so forth. However, these bells and whistles were not essential to addressing the core problem. I could spend weeks working on the Xero and GPS integrations, before I had even tested the assumption that I could solve the core problems. This is a very easy way to waste resources, and that's why I recommend building the absolute bear minimum features to start with. This type of release is widely known as an MVP or Minimally Viable Product.
An MVP is minimal because it is cheap and quick to build, yet viable because it should solve your users' core problem. If you can't solve the users' core problem, there's no point working on the bells and whistles, so why build them now, when you can definitely add them later on?
So, that's the context for the actual meat of step 6: In the beginning, only build the things you absolutely have to.
Have a brainstorm session and think of all the features your app would have in an ideal world. Include every single bell and whistle. Get some friends and open a beverage or two of your choice to get the creative juices flowing, if that's your thing. With your long list of features in place, it's now time to practice some discipline. Go through your list of ideal features and classify each of them as either Essential or Nice To Have. Be ruthless. You probably need far, far less than you realise. The more ruthless you are, the shorter your build time will be, and the lower your financial risk will be.
You probably don't need the mobile app version. You probably don't need GPS integration. To be honest, you probably don't even need user accounts.
Your MVP might be a WordPress template hooked up to a GoogleSheet, with you manually processing the data as necessary. It's okay and in fact good if it's ugly or crappy. You don't want to spend a minute or dollar more than you have to at this stage until you're sure you're onto a winner.
Be sure to engage closely with your early adopters during this process, especially for the features you're not sure about. Remember though, that just because one of your early adopters says they want it, doesn't mean it's Essential. It very well might be just a Nice To Have. The final decision rests with you.
The first few times I did this I found it very difficult because of the emotional attachment I had developed towards this grandiose vision of what I wanted each app to be like. That grandiose vision is great, and you will need it eventually, so hold onto it. But for now, it's time to understand that you aren't trying to build a professional level app just yet. You're simply trying to develop proof of concept. Throw out the bells and whistles.
Organise all of the Essential features into their own list, and title this list v1.0. Everything else should go under the title Future. You can come back later and break Future down into v1.1, v1.2 and so forth, however at this stage, it's not necessary. This document is now your feature roadmap.
Be sure to mention a few simple features related to measuring key performance indicators. For example, ideally your web app should have some basic Google Analytics integrations to help you measure how many page views, sign-ups, or sales you get. A mobile app should have some simple integrations to Firebase Analytics or similar. And yes, these features are Essential in every build, as they inform your decision making for the future.
For the features under the Essential column, it's important to be quite explicit in your description. This will be very important if you decide to engage a software developer later. For example, don't say "Friends List". Say: "A user can add friends to their friends list, message them privately, invite them to play chess, and block or remove them.". The more detail you provide, the easier it will be later on.
Importantly, once your Essential list is finished and you're happy with it, lock it in and commit to it. This is the beginnings of your v1.0 design document, and one of the principles of a good design document is that it has a fixed goal. It's okay if you think of new features you want to have in your app, but they should be going into the Future section of the roadmap unless they are absolutely essential, which is unlikely given that you hadn't even thought of it until late in the piece.
By proceeding in this fashion, you avoid what's called Feature Creep, a dreaded maelstrom of software development in which new features are constantly being added to the design document, and you never actually reach a point where your app is able to be released. More on this in a future article.
Step 7: Draw your App Storyboard
Now that you know exactly which features are going into version 1.0 of your app, it's time to flesh out some of the screen flows in your app.
I've found the best way to start this is with a few pieces of A4 paper on a table with a pen and paper. A whiteboard is another option. Each piece of A4 paper is one "screen" on the app. Give each page a title, and give a rough layout of what each screen would look like. Include the buttons and where they would take the user. Lay the pages out on the table in order just like it's a storyboard for a movie.
It's important to note here that real UI design is an absolute skill and art that takes a while to learn to do properly. However, the average person has had enough exposure to apps of various quality nowadays to know the basics of what works and what doesn't. In the event that you're really stuck, open your favourite app and "borrow" some of their design principles. One of my favourite UI designs is from Spotify - I recommend checking out their apps for inspiration.
Depending on the complexity of your app, a pen and paper storyboard might be all that you need. Consider either taking a photo of your table layout or finalising it on a piece of A3 paper - you want to store this in a semi-presentable way so that you can share it with other people in the future. For more complex apps, I recommend digitalising the storyboard more formally. There are heaps of great apps that can help you do this, however in the beginning I recommend keeping it simple. The free tool Draw.io is one of my absolute favourites. Some other tools I use include Adobe Photoshop and Adobe Experience Design. Other people rave about the UI app Zeplin, although I've never used it myself.
You can also compile your app screens in Google Sheets or Microsoft Powerpoint and link the buttons to the actual respective screens. Very nifty!
Choose one of the above tools and draw the interface to the best of your ability. It doesn't have to be pixel perfect, but it's far easier and cheaper to make changes in a Draw.io diagram than it is once someone has actually programmed your app. Try to get the colours, fonts and element layout as close to the way you want it as possible. Once this is finalised, append it to your design document, and lock it in. All future changes to your UI should ideally go in the Future basket.
Share your storyboard with your early adopters, and consider their feedback. Remember though, unless the feedback they offer includes features that are absolutely essential, everything they mention should go into the Future column of the design document.
As an example, I found an old storyboard I whipped up for one of the early versions of Daily Medical Trivia. Check it out here.
As a bonus tip for those on mobile, if you've done a reasonable job of building one of the screens from your storyboard, you can go to a website like MockUPhone and put an iPhone frame around it. You can then take those framed images and add them to your landing pages or your Facebook page to supercharge your user acquisition.
Step 8: Write your App's Content
If you've made it this far, step 8 should be relatively straight-forward. It's time to prepare all the content that will populate your application.
This will of course vary widely depending on what your app does, but this is another step that people often overlook. You do this now, not once your app is half-way through being coded.
If you're making a medical trivia app, write your first 100 trivia questions. If you're making a website to share and sell sheet music, what music will you use? What will your introduction screen say? What about the buttons? The disclaimer page? The privacy policy?
And remember, content doesn't just mean the stuff you can see, either. It might also include special functionality that your app provides. For example, If you're making a drug-dosing calculator, what will be the exact formula the calculator will use to determine the doses? If you're making a dating application that matches people who are romantically compatible, what are the criteria the algorithm will use to find matches? Try to be as explicit as possible here, and don't forget about the edge cases, such as how the dating algorithm should handle the edge case that there are no matches available for a person.
It's difficult to go into much further detail here without getting into app specifics, but I hope I've communicated the general premise clearly. Fill your app with content. The wording does not have to be perfect for now, but you should try and provide as much detail as your v1.0 will reasonably require.
One final tip, depending on what sort of content you're compiling, do your best to keep it as organised as possible. For example, if you're writing trivia questions, make a spreadsheet and have one column for the question body and another column for each of the answers. Or for your sheet music, use a consistent folder and filename structure, perhaps by author or genre. This will make integrating the content into your app a far easier job when the time comes.
Step 9: Get Your MVP Built
If you've been following the guide closely up until now, you'll know that you've got quite a nice blueprint for what your app is going to look like at launch. You've got a storyboard with all the app screen flows mapped out, a list of Essential features, and your first chunk of content ready to go.
Hopefully you've got a nice community of people who encounter your problem frequently on hand as well. This might be a good time to update them on your progress so far and let them know that the launch is coming soon. I encourage you to do this in a professional, non-spammy way as much as possible. Personalising each communication is a good way to start if this is feasible. And to be honest, the less contacts you have, the more important each one is, so if you've only got 12 people on your list, I hope you write some really good emails!
If you've been grinding pretty hard, hopefully you're only a week or two in, and maybe $50-$100 deep. You've come quite a long way with very little investment. Well done!
We now have to face that hurdle we've been trying to put off this whole time: actually building this thing.
The first principle to understand here is that under normal conditions, you can only have two of the following:
- Fast
- Cheap
- Good (Quality)
Which two you choose will likely depend on your personal circumstances, your goals, and the resources you have available to you.
My personal opinion on this matter is that in the early days, you should tune out your grandpa's advice that says "Measure twice, cut once" and abandon Quality.
We're not making toaster ovens here. Our first impressions do not last. Do you remember how bad the first version of Facebook was?
Neither do I.
This is the world of software. We can painlessly upgrade our app quality over time, and our users are unlikely to remember our crappy, buggy first version a few hours after we release a patch.
On the other hand, Fast and Cheap are extremely important. Fast is important because if we can't quickly work out whether we can solve our target problem in a meaningful way, we risk wasting many months of our time for no gain. Cheap is a bit more self-explanatory - if you had unlimited money to splash around, I daresay you wouldn't be reading this guide. Mr Gates, if you're reading this, let's catch up.
What it boils down to is that Fast and Cheap are both essential to protect our most precious finite resources: Time and Money. Quality on the other hand only really protects us from a reputation perspective. While reputation is of course valuable in the long run, if your app is buggy and low quality yet still solves an important problem, you will have no trouble building a positive reputation anyway.
I'm now going to discuss your MVP development options in the context of the Fast, Cheap and Quality theme. I'm going to list your options in the order that I think you should consider them. Your options for getting an MVP built are:
- Winging it. Cheap and Fast. Use whatever rudimentary IT skills you have to throw something together. Look at website builder tools like WordPress or Wix or an app builder like AppHive.io. The world of WordPress plugins will likely provide the functionality you require for somewhere in the range of $20-$50. They often come with very comprehensive guides, too. Heck, find any number of a thousand YouTube web or app development tutorials that are similar to your idea, copy the entire source code, and make a change or two as required. Follow another guide from the same channel about how to publish the source code. If you get stuck, send the YouTuber or author of the guide a message. In general, the developer/hacker community love to help each other. Leverage this. Alternatively, build your MVP in PowerPoint or Google Slides. This can be done in an afternoon and can help you validate demand for a more legitimate version of your app. If you do this, let me know and I'll help promote you, because I absolutely love simple and elegant MVPs with low investment. If you want to more about Winging it and rapidly prototyping MVPs, be sure to leave your email here and I'll send some of my guides when they become available in the future.
- Partnering up. Cheap and Fast. Take everything you've done for your project so far and find a developer to work with you on it. This option is Fast because your developer will ideally be experienced and already know how to build what you're proposing, and Cheap because you should be able to broker a deal that will result in little to no out of pocket expense in exchange for an equity stake in the proceeds. The exact proportions will vary depending on the project and your developer's experience. The specifics of this negotiation are probably a topic for another article, but know that you probably need a very good reason to offer them less than 50%. If you don't know any developers personally, reach out to your extended network of family and friends, your local university's computing society, or even make a post on any number of online developer communities such as /r/startups. Note that while developer skill is important, trust and developer motivation should be valued highly. Furthermore, there's a right way to go about pitching a developer and there's a wrong way. Let me first give you a few subtle traits of people who tend to do this poorly:
- "I've got this million dollar idea for an app, but before we discuss it further you'll have to sign this Non-Disclosure Agreement."
- "I've got an app idea but I haven't done any work up front for it. You build the app, I'll do the marketing and we'll split it 70/30 since it's my idea."
- "I've got an app idea, can you build it for us? It should be able to do a, b, c, d, e, f [...] x, y and z in the first version. I think we also better throw in some AI and virtual reality for good measure. You should do it for free because it's my idea - we'll talk about the equity split later."
- "Hi developer, I thought you might be interested in getting involved in a project I've been working on to solve problem. The solution is called App Name, and the design process is 100% complete. I have 681 clicks on my landing page and have captured 176 emails of users waiting to use my app. All I need is someone to build it. You can review my design document, feature roadmap and app storyboard at the link here. As you know, industry is a massive field, so there'd be lots of room to grow this project into x, y or z down the line. I'd like to partner with you in exchange for a healthy equity stake of the app. Let me know if this interests you. Regards, Josh"
- Learning to code. Cheap and... that's about it. While I strongly advocate that everyone should consider learning to code (even doctors and medical students), the truth is this is a slow way to reach what will inevitably be a low-quality first version. Note that low-quality is not necessarily a bad thing - see the discussion above. If you do go this route, (which at the end of the day, is what I did to pick up the skills that I have), be sure to be extra ruthless when picking out your Essential features. Every single thing that you add to your first app version adds complexity and makes it that much harder to get your MVP off the ground. This route has big advantages though, namely being that for every additional app you build, you get a little bit better, and a little bit faster. And after a couple of months of effort, you might find yourself with some very lucrative skills. Additionally, you also come to know your own app inside and out which is very important as you get further down the road. So, in summary: definitely consider this if you are willing to put in the time and effort. However, given that this guide is targeted towards launching your app, officially speaking, I don't recommend learning to code your own application as it will slow you down considerably, and at the end of the day, speed is king.
- Going to a dev shop or freelancer. Fast and Quality. (Hopefully). Go to a commerical development house and pay them to build your app. This option is available to those who have more money at their disposal than others. However, I don't recommend it for several reasons:
- The dev shops interests and your interests are not aligned. You want your app to be successful, whereas they want to sell you as much development as possible. They will happily sell you tens of thousands of dollars worth of development that you absolutely don't need.
- Their goal is to get your app built as quickly as possible, and this may affect the quality of the code inside the app. Not that you really have a way to know.
- As a non-programmer, it's very difficult to know if you're getting a reasonable quote for your project. Either way, it's going to be expensive, though.
- The quality of dev shops varies enormously. Some use on-shore developers, while others are simply a front for off-shore dev houses where the costs are lower. Some are both. Either way, it's really hard to know what you're getting. How strong is the developer's English? Are they responsive to issues or bugs that arise? What is the quality of their code? These are all difficult questions to answer for a non-programmer, and for that reason I would recommend a dev shop or freelancer that comes by recommendation from a trusted source, perhaps a mutual friend.
- Paying for development typically involves agreeing on fixed set of features, very much like the design document you have already created. However, what happens if you want to make one small-medium size change based on the feedback of your users? This is particularly important say, 1 month after the dev shop finishes your build. You've paid your huge chunk of cash, and have an MVP. However, it's just an MVP. How are you going to add more features and fix bugs? How are you going to take this project further? Just remember that any quotes you receive are tip of the iceberg for this route, and further costs are almost unavoidable if your app is successful.
Once you've found your developer (either yourself or someone else), try to be upfront about timeframes. Set a goal launch date, circle it on your calendar, and commit to it. This is valuable because it enables you to tailor your marketing and user acquisition efforts, and also gives you some leverage if your experience with your developer isn't working out, which is unfortunately quite common for side hustles. For example, if your developer becomes quite flakey and unresponsive, you could use the missed deadline as a reason to dissolve the partnership and find another developer. Either way though, remember to remain courteous and professional at all times. Even if you drop them as a developer, they still deserve your respect, just as you deserve theirs. Know that it's quite common to have issues in a partnership centred around different levels of motivation, and therefore don't hesitate to find someone else if the project isn't going anywhere.
Step 10: Finalise Brand Assets and Landing Pages
Congratulations! If you've found someone to build your MVP in step 9, you're well and truly over the hump and on the final stretch now.
Ideally during this whole process, you've been still acquiring users through your Facebook ads or content marketing or by simply networking with the people who experience your problem frequently. Continue to do this, and in fact, you can double down now that your app is in the pipeline. Every single piece of contact information you receive during this time will help your launch succeed.
While your MVP is being built somewhere, it's now time to tidy some things up and prepare for your launch.
Here are some things you might want to consider at this time:
- Hopefully your developer is gradually releasing development builds as they become available. Gather a close group of trusted users (your early adopters) and make sure they are testing and reviewing each build as they are published. It may feel tempting to want to delay this as long as possible so as not to "spoil" your launch, but you want to catch and resolve issues that arise (like bugs or misunderstandings) as early as possible. You don't have let everyone into this group, but 10-15% of your most trusted users is a good starting point.
- Tidy up your Facebook page assets and colour schemes to ensure they match your app storyboard. Do the same for your old landing page, and make sure that it reflects the current state of your project.
- Buy your domain name if you haven't already. '.com' is a very popular top-level domain however you get no real advantages for having it. NameCheap is the only place I go for domains - they totally rock and this is not a sponsored message. They actually do.
- Claim all your social media handles. This includes but is not limited to MySpace, Pinterest, Club Penguin and any other decrepit online wasteland you can think of. The idea is to have all of them reserved whether you use them or not. If you're having issues getting a somewhat consistent username, change your app name. You may benefit from creating a Gmail account to function as the generic login for this app on all other sites as well.
- If you're on mobile and haven't got your AppStore and GooglePlay accounts by now, you absolutely must do this as soon as possible. Get all the contracts and bureaucracy sorted, then get started on your app store listings, display screenshots, and app icons. Don't underestimate the amount of effort required to get on top of all these things as it's important for a successful launch.
- Draft your launch day email now, even if it's still weeks away. Consider using any of a number of free HTML email templates to give your launch day email a professional touch. Be sure to practice sending this several times to make sure it looks great on various devices, and that all the links in the email work. I once completely ruined a launch to an 800-stong mailing list by sending out an email with a button that linked to the wrong location. Don't be like me.
- I recommend linking to the most direct way your users can access your app, ie your sign up or download page, not your old landing page. Every click the user has to make will result in a huge chunk of users dropping out.
- Jump back on to Canva and prepare your first few social media posts on each of the social platforms you're operating at the moment. By now, it's not unreasonable to have a Facebook page, a Twitter, a LinkedIn, an Instagram and more, but I note that the most relevant platforms will likely change depending on when you read this guide, so stay woke. You can even schedule most of your posts nowadays to take the pressure off launch day.
- Consider contacting local publications about your launch. In general, smaller publications are easier to get into, but offer less exposure. Try places like your university newspaper, an industry magazine, an alumni group or a popular social media page/influencer in your niche. Be sure to let your extended family know as well. If you're writing to a local tabloid, know that lots of online journalism is shovelware these days, and if you go to the effort of writing 95% of the article yourself in your email, you'll have a higher chance of being published.
- Think about any other creative ways you could generate some publicity around launch time. This might involve supporting stakeholders in some way in exchange for speaking at one of their events about your journey so far, for example. Be creative!
Step 11: Launch
If you've made it this far, you're completely awesome. You've come further 0.1% of the population ever will, and for that, you deserve credit.
Here are my top tips for a successful launch day:
- Be very cautious with any "last minute patches". Your goal is to have a very stable build at launch time, and any last minute changes risk you sending everyone to an app that is currently crashing. Test thoroughly.
- Have a practice "pre-launch" the day before to your family, friends and inner circle of early adopters. This can help you iron out issues before you go live to your mailing list.
- Launch on a day where you have a completely clear schedule. You should be available to respond to any messages you receive from your users, either congratulating you or more realistically notifying you of issues with your app. This is a great time to share with your early adopters and extend those relationships. Take advantage of it.
- Do not launch your app and then go to sleep, or go to work for example. If you do this, you risk waking up 8 hours later to a whole heap of people who are annoyed they couldn't use what you had to offer due to a fixable bug.
- It's handy having your developer on hand or at least very aware of the launch date too, as it's likely there will be at least a typo or two they can patch out for you.
- Keep your expectations realistic. You've worked very hard to get here, but know that almost all apps fail, and that it's okay to fail. If the numbers aren't what you were hoping for, that's okay. It might mean that it's time to pivot your idea slightly, or drop the idea altogether and work on something else. This is the reason this whole guide has been focused on a quick launch with a low investment of money and time. You want to save something in the tank for your next idea!
- Importantly, enjoy the launch. Set up with a cup of coffee and some friends to celebrate the work you've put in to reach this point. Whether you go viral or flop like a noodle in a kettle, you've learnt a lot in getting here, so it's never a waste of time.
Step 12: Measure the Important Things, and Act Accordingly
You've launched your app now, and so within 24 or 48 hours or so you should have some idea of the level of attention your app can hope to receive during the launch phase. Now the real work begins! How we do we keep the momentum going?
You'll recall way back in step 6 (when we built our feature roadmap) that I insisted you implement some sort of analytics into your app. It's now time to dive right into the data available in the analytics dashboard and leverage it to decide what to do next. I plan to provide future articles about how to interpret analytics data correctly, so for now I'll simply provide a few key points:
- Try to focus on the important high-level metrics the most, especially in the beginning. Clicks, signups, sales. Worry more about the assorted "actions per page view" stuff later.
- Another important metric is to look at how many of yours users are returning to your application. If users aren't returning to your app, it's a sign that your app is not sticky. You might not be solving your users' problem in a meaningful way. If your app is not sticky and users are not returning, no matter how good your launch has been, your success will be fleeting. Try to understand why people are not returning - even if you have to ask individual users directly. Prioritise the features required to fix this.
- Look for trends in the data to help you make improvements to your app. Google Analytics for example will occasionally notice something automatically. For example: "Users on Android spend 80% less time on your site.". This may indicate that there's a bug on Android rendering your app useless. Investigate this.
- Remember how we "fake launched" our app to begin with? You can (and should) do this for new features, too. Publish the button for a new feature in your app before you've actually built it, and measure the number of clicks it gets. If it gets a lot of clicks, go ahead and build it. If it gets none, delay and cancel the feature altogether.
At a high level, you've really got 3 options after looking at the outcome of your launch:
- Immediately start working on your first update
- Let the dust settle, and review the analytics in 1-2 days time
- Bin the project
If your launch exceeded your expectations, you should probably start working on your first patch as soon as possible, as it's important to strike while the iron's hot. Attention spans are short-lived in this day and age. Return to your design document and complete steps 6, 7, 8 and 9 for your new update. Importantly, don't bite off more than you can chew! Keep the update size small to begin with. The defensive approach to resource allocation still applies.
If your launch has FAR exceeded your expectations and absolutely exploded, you're probably having all sorts of issues related to scale right now. For example, perhaps there are so many people trying to get to your landing page or access your app's servers that it's constantly crashing. In which case, you'll be facing a whole lot of really fun problems to handle in putting the train tracks down in front of the train. This has only really happened to me once in my life, and it was an extremely exhausting time, but also a whole lot of fun. I'd like to elaborate on this situation a bit further, but that is perhaps a topic for a future article.
On the other hand, if your numbers are lukewarm, you might choose to sit on your laurels for a bit, promote your app some more, and see how deep the rabbit hole goes before you work on your first update. Review the analytics in two days and take stock of all the available information then. Sometimes all a launch needs is one medium sized page or publication to pick it up and share it to give it a bit of a kick-start, and this won't necessarily happen on day 0.
If you were completely underwhelmed, go back through steps 1-11 and see if there are any avenues you ignored that you can leverage now to get things going in the right direction. At this point, it may feel tempting to poor lots of money into ads, but this sort of attention is costly and sadly fleeting. The goal is to get to a point where through word-of-mouth and the quality of the solution your app provides, your user base will grow without being completely reliant on paid advertising.
In Conclusion
Well, that's it. That's How to Create and Launch Your App: A 12 Step Guide for Those Who Don't Code.
Next time you're at the dinner table at Christmas and your uncle or your old highschool friend says "we should turn this into an app", you should send them this guide and tell them to get cracking. No more excuses!
Thank you for reading this article in full, I very much appreciate it. If you've found this guide useful, please consider leaving your email here for more guides and tech tutorials. Additionally, please feel free to follow me or send me a message on Twitter or LinkedIn if you've got any questions or comments about any of the content contained within. Especially if you've followed this guide and managed to build something! I would love to hear about it and support you in any way I can.
Time to get hacking!
Written By
Josh Case
Medical doctor & software developer. Chief Technical Officer (CTO) at Go Locum. Author of Code Blue: An Introduction to Programming for Doctors and Medical Students.